What better way to be close to loved ones if you aren’t in the same place! Record your voice reading a book and then share the audio file.
Before starting, make sure you have three items ready to go:
1. a working microphone connected to your computer – I used my internal microphone on my laptop;
2. recording software installed on your computer – install Audacity, a free audio recording and editing program that works on all operating systems;

3. a good book to read aloud. When I decided to make an audio book, it was for my niece and nephew in Burnaby, BC so I needed something age appropriate for them. I searched for ebooks on Google and had an incredible amount of books to choose from.
Here are the general steps to make a recording, assuming your microphone is ready to go:
1. Launch Audacity.
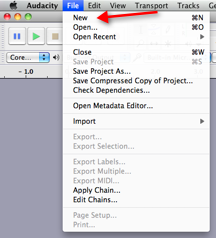
2. From the File Menu, click New.

3. Name and save the file as an Audacity Project File (.aup is the file extension).
You can choose other file saving options, however, if you save as an Audacity Project File, then you can make future changes to the original recording and simply export to the desired format upon completion. You won’t have to start all over with a new recording.
You’ll see in the example below that I start out with an .aup extension and then typically export to a .m4a or .mp3 extension. Why? The latter two file types let me play files in iTunes and they are typically smaller in file size. They are easier to import to and play back on my iPod, and, share with others.
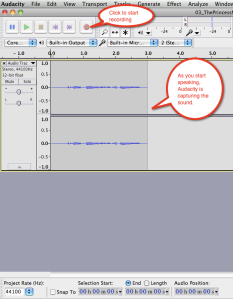
4. To record, click the red button on the menu and start reading from your book. To stop, click the yellow square “stop” button.
5. When you have finished recording, save the Audacity Project File (click File, Save).
Then export the recording to either an .mp3 or .m4a file format. Click File, Export and then choose a format from the formatting options list. See the example below.

6. Check the file location on your computer for your audio recording. If you’ve followed these steps, you will see three files with the same name.
7. Share the file with the .m4a or .mp3 extension. For convenience and due to size limitations for sending files by email (typically), I’d use Dropbox as my method of choice.
Happy recording! Let me know how it goes.


